Friday, July 15, 2011

Time flies when you're having fun!

I have severely neglected my blog lately. Summer is such a busy time it just seems like I can't do it all so my blog just had to take a back seat for a few days. The last week has been especially busy with packing for our European trip. This will be our first trip across the pond so we want to do it right so there's been tons of research going into planning that trip. We'll be going to Spain, Monaco, Italy and Sicily, Greece, Croatia, Switzerland and France. 7 countries in 3 weeks... I'm not sure if that totally qualifies as a vacation as we will be running around pretty much the whole time!

Jokes aside, I'm really looking forward to enjoying a sangria in Barcelona, gelato and pasta in Italy, chocolates in Switzerland, wine in Bordeaux and Champagne in Reims only to name a few... I've actually never been so excited and so nervous at the same time! Our bags are packed and in a few hours we'll be heading to the airport to embark on this great adventure which means that there will be no posts for a while as our internet access will be limited for the bulk of our trip. Rest assure, there will be lots of pictures and stories when I get back!

But before I go, here is one last recipe. My husband and I have been having a lot of salads lately has our lettuce has been ready for the last couple of weeks. There is something so nice about eating the fruit of your hard labour!
So this week I gathered a bunch of fresh herbs and lettuce and make this amazing salad with steak, baby tomatoes and a spicy chimichurri sauce, so good. If you've never had chimichurri sauce you're in for a treat! It is full of flavour, spicy and it almost has a creaminess to it. Mixed with the fresh veggies and the steak and it was a definitely hit at my house.

Enjoy!

Baby greens, steak and tomatoes with chimichurri
(adapted from Food and Drink magazine)

2-3 dried chili peppers with or without the seeds (depends on how you feel about spicy food)
2 garlic cloves, minced
Salt and pepper to taste
5 tsp red wine vinegar
4 tbsp olive oil
4 tbsp parsley
4 tbsp coriander
4 cups of baby greens (in my case I used lettuce)
Leftover grilled steaks (or like me you can grill one for the occasion)
1 bell pepper thinly slice into strips (whichever colour you have on hand)
1 pint of cherry tomatoes
2/3 cup feta cheese or goat cheese
Thinly slice peppers
Place peppers in a bowl along with garlic, salt and pepper, vinegar and oil and whisk together
Place the mixture in a food processor or small blender, add the herbs
Mix until smooth
Place the lettuce in a large bowl
Add cherry tomatoes and bell pepper
Sprinkle with cheese
Add the steak, poor the chimicchuri sauce on top, toss lightly and enjoy!

serves 3-4


Wednesday, July 6, 2011

White Sangria Jello

Well summer is definitely here now! The last couple of days have been so hot and sticky that I have not really been motivated to cook a whole lot. To be perfectly honest, I would be just fine with eating ice cream or drinking a slushy as opposed to having a regular meal! But since that's not really a healthy option, we've been barbecuing a lot and making lots of salads and sandwiches. When looking for recipes for sandwiches, I found this great article in Chatelaine magazine with pic-nic recipes. The white sangria jello recipe quickly caught my attention.
Although I haven't eaten it in years, as a kid I always enjoyed eating jello especially in the summer. I remember that my mom use to make a pie with tons of strawberries, jello and whip cream when it was strawberry season so the idea of making this hello recipe was quite exciting (I also really liked the idea of using mason jars for containers, it makes it so easy to carry around).

The recipe itself was quite simple and only took a few minutes to complete. Actually it was pretty much as easy as making regular jello if you ask me. The final product was also quite good. It was refreshing and you could definitely tell that it was wine based (which can be a good or bad thing depending on whether or not you enjoy wine!).

Hope you enjoy the recipe and the fabulous weather!!!

White Sangria Jello
(Chatelaine)

1 bottle of fruity wine (I used a riesling)
2 cups of white grape juicy
2 tablespoons sugar
2 enveloppes of unflavoured gelatin powder (7.2 g each)
3 cups of fresh berries (in my case I used peaches and strawberries)
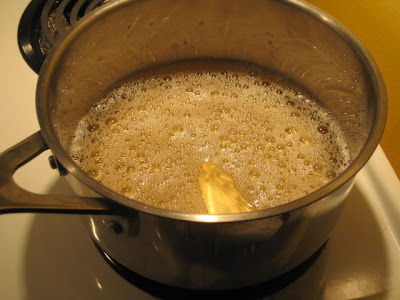
Pour wine into a medium saucepan and set over medium-high. Bring just to a boil, then remove from heat.
Whisk in gelatin and sugar until both are dissolved. Then stir in grape juice
Divide cup fruit among 8 250ml mason jars.
Pour wine mixture. Refrigerate until set (about 3 hours)

Monday, July 4, 2011

4th of July barbecued sausage kebabs

So today my American friends were celebrating Independence Day and since I did live in the US for a year, I like to celebrate this holiday too and what better way to celebrate then by barbecuing! Typically I would go for big juicy burgers, but I was in the mood for something a little more sophisticated so I decided to make kebabs instead.
The recipe I chose to make to make on this special day is a sausage kebab. This is one of my go-to recipe   has it does not require a ton of ingredients and steps and it can be put together fairly quickly (which was necessary today since we had been away at the cottage all weekend). This also happens to be one of my husband's favorite recipe as it is has lots of flavour and the tabasco sauce gives it an extra kick.
You can make this recipe as spicy as you like. In this particular case I used spicy Italian sausages, but you can use mild sausages if you prefer. You can also omit or reduce the Tabasco if you are not big on spicy. You'll find that this recipe is also a nice change from the more traditional chicken, beef or even pork kebabs. If you've never tried grilling cherry tomatoes, you're in for a treat. Grilled tomatoes will literally explode in your mouth and the flavour is great too!

Hope you enjoy!

Summer Sausage Kebabs
(based on a recipe from Chatelaine)

8 Italian sausages
1 pint of cherry tomatoes
1 green pepper
1 large onion
1/2 cup barbecue sauce
2 tablespoons Dijon mustard
1 teaspoon Tabasco sauce
1 tablespoon honey
Cut sausage inton 2 inch chunks and place in a large ziploc bag.
Cut the onion and the peppers in 2 inch chunks and place in the ziploc bag along with the sausages
Mix together the barbecue sauce, the Tabasco sauce, the Dijon mustard and the honey.
Pour into the ziploc bag. Place bag in the fridge and let marinade for at least 30 minutes (up to 2 hours).
Pre-heat the barbecue (medium-high)
Place meat on skewers alternating with the onions, peppers and cherry tomatoes
Grill the kebabs on the barbecue for 6-8 minutes per side.

Serve with rice.
Serves 4 people

Saturday, July 2, 2011

Scones? Yes please!

When guests spend the night at my place, I typically ask them what they would like to eat for breakfast the next day. The answer I usually get is: “scones please!” Blueberry, cranberry, plain, chocolate chips or blackberry, my guests are never disappointed with my scones. Leftover are rare, but if there are any, my guests are always more than happy to leave with a doggy bag.
Growing up I thought all scones were dry and plain and although I did enjoy eating them with Devon cream (English clotted cream), they were not my favourite. But as time went on, I became more curious about this breakfast treat and started trying different recipes. After several attempts and some catastrophes (sort of), lots of tweaking, combining and subsidizing, I finally found a recipe that is sweet, yet not too sweet and moist while not being too “cakey”. The secret: buttermilk, lot’s of it!

You see, most of the recipes that I tried called for 2/3 cup – ¾ cup of buttermilk for 3 cups of flour, but I generally put 1 generous cup, giving my scone this extra moisture that I was craving. Another thing that I have worked on was to be able to offer different varieties without having to bake all morning so I came up with this basic recipe in which I just have to add the toppings I want. I also tend to separate my batter in 3 and then add the toppings which allow me to make 3 different kinds of mini-scones in one batch (that way I can please all of my houseguests!). 
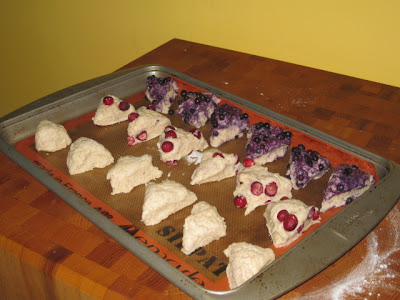
One thing that I should mention is that when I took the pictures for this particular post, I totally forgot to put the blueberries back in the freezer after taking the ingredients picture. The result, the blueberries had time to thaw so the blueberry scones turned out blue. Moral of the story, leave your blueberries in the freezer until you are ready to incorporate them into your batter. You could also use fresh berries, but through all my trials and errors, I noticed that frozen fruits also help give extra moisture so I would stick to frozen fruits (bonus, frozen fruits are available year round at a very reasonable price).


I could have re-done the pictures for this post as I make this recipe quite often, but I chose not to in order for all of you to avoid doing the same mistake (and maybe to prove my friend Lianne wrong. See Lianne, I do make mistakes in the kitchen from time to time!)


So for all of you out there, here is my famous scone recipe, hope you enjoy!


Lysianne's basic scone recipe

1 cup of buttermilk
1 egg
3 C. flour (I typically use half regular half whole wheat)
4 t. baking powder
1/2 t. baking soda
1/2 C. butter (I use salted)
1/2 C. sugar
½ teaspoon of lemon juice
Frozen fruits or chocolate chips
Preheat oven to 375°F.

Beat egg into buttermilk then add lemon juice, set aside. In the bowl of your stand mixer (you can also mix the ingredients the good old fashion way, but you have to be extremely careful not to over mix otherwise the scones will be dried) sift together (using your flat beater) flour, baking powder, soda and salt. Add the butter (mix until the chunks of butter are about the size of peas).
Add the buttermilk and egg mixture and mix well (at the lowest speed). Once your dough is even (no lumps) add your sugar and mix until you reach an even consistency.
Put your dough onto a floured board and form 3 even balls. 
 Incorporate your fruits into the dough. Then pat out your ball to form a thick circle.
Cut each circle into 6 wedges and transfer onto a baking sheet (I always use a silpat!)
Bake for 15 -20 minutes (depending on your oven). Serve warm with butter, Devon cream (English cream) or like many of my friends like it with maple butter!
They will keep in a sealed container at room temperature for 2 days or you can also freeze them for up to a month (but you won't need to!).
Makes 18 mini scones

Friday, July 1, 2011

Fresh French Baguette (a.k.a. I forgot to buy baguette so now I have to make some)!

I mentioned in one of my earlier post, last Friday was a holiday in Quebec and all the stores were closed. In the spirit of our upcoming trip to Europe we had decided to host a little European inspired lunch for our inlaws. So the night before my husband and I went grocery shopping for all the essentials. I should mention that it was right after a 5 à 7 and my mind was not exactly clear so I totally forgot to buy a baguette.

When I woke up the next day I realized the terrible mistake I had made and quickly realized that there was only one solution: to actually bake baguettes. I have made bread before, several different kinds and I have generally been successful at it, so I felt confident that I could do it. So I pulled out my trusty Joy of Cooking cookbook (by the way if I only had to have one cookbook this would be it! It covers all the basis and always comes in handy when you need a recipe) and quickly gathered all the ingredients for the recipe.

Small problem, I realized that I was also running low on yeast (which never happens, but of course it had to happen this day out of all days) and that I did not have the 2 1/4 teaspoon the recipe called for, but I decided to give the recipe a go anyways as I had no other solutions.

When I try a new recipe, especially one with yeast, I like to read it a couple times, to make sure I know how to proceed and I also avoid making it for guest the first time I try it just in case it does not turn out so well. But there was no time for that this time and in the end, everything worked out just fine!

The baguette was delicious (my husband who doesn't care for bread loved it so that's always a good sign) and I will for sure make it again. It was not super complicated (especially if you are using a mixer), it just required a long time to rise.

So moral of the story, don't be afraid to try new things even if they seem complicated at first 'cause it might just be delicious!

Bon appétit!

French Bread a.k.a. baguette

4 cups all purpose flour
2 teaspoons salt
2 1/4 teaspoons active dry yeast (1 package)
1 1/2 cup water at 100F
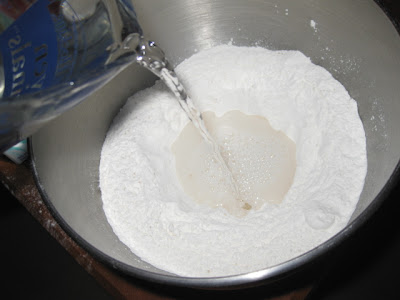
Mix all the dry ingredients in a large bowl (I used my Kitchen aid mixer bowl) and make a well in the centre and pour in the water.
Stir thoroughly by hand or in a heavy duty mixer, until dough is soft and elastic, about 12 minutes on low speed.
Cover dough with a clean cloth and let rise in a warm place until double in bulk (I usually place my dough in the oven with just the light on and it does the trick) which will take about 2 hours.

Punch down the dough.
Divide the dough in half on a floured board and pat into 2 equal rectangles.
Form each into a baguette by rolling the dough, pressing outward with your hands and tapering the dough toward the ends until you have a long, thin loaf.
Place loaf onto a greased baking sheet (or you can use your silpat).
Cover the loaves with a wet clean cloth.
Let rise in a warm place until somewhat less than doubled.
Pre-heat the oven to 400F
In the bottom of the oven, preheat a baking pan filled with 1 cup of hot water (it should steam)

Bake the bread on the oven's centre rack for 15 minutes, then reduce the heat to 350F and bake about 30 minutes longer.
Bake until the crust is golden brown and the bottom sounds hollow when tapped.
Let cool completely on a rack.
Gives 2 baguettes