Tuesday, May 31, 2011

Diner Party Part 2: Fiddleheads and Edamame Salad with Feta

I’ve often walked by fiddleheads at the grocery store and wondered what I could do with them. One of my aunt had mentioned that she usually cook them with a little bit of butter and garlic, which did sound good, but not enough for me to try them. Since fiddleheads are a source of both Omega 3 and Omega 6 and are high in iron and fiber, I kept looking for a delicious way to prepare them.

A few weeks I got a copy of the Food and Drinks magazine from the LCBO (you can get most of their recipes on their website if like me you don’t live in Ontario) and I saw this cool recipe and thought why not? I mean, how can I go wrong with something that has feta in it!

So on Saturday, I gathered all the ingredients and gave it a go. Thank God it was good, because I did serve it to company! The flavor was good and the texture of the salad was quite interesting (from the creamy feta to the crunchy fiddleheads) and I would definitely try this again.

In case you don’t know, fiddlehead season is fairly short and it’s almost over so if you want to try this, now would be a good time! Hope you enjoy!

Fiddlehead & Edamame Salad with Feta
(adapted from the Food and Drink magazine)


8oz (250G) of fresh fiddle heads, stem end trimmed
1 ½ cup shelled edamame (fresh or frozen and defrosted)
1 tablespoon of lemon juice
3 tablespoons extra virgin olive oil
Pinch of sugar
Freshly ground pepper
¼ cup feta cheese, finely crumbled
Fleur de sel for sprinkling

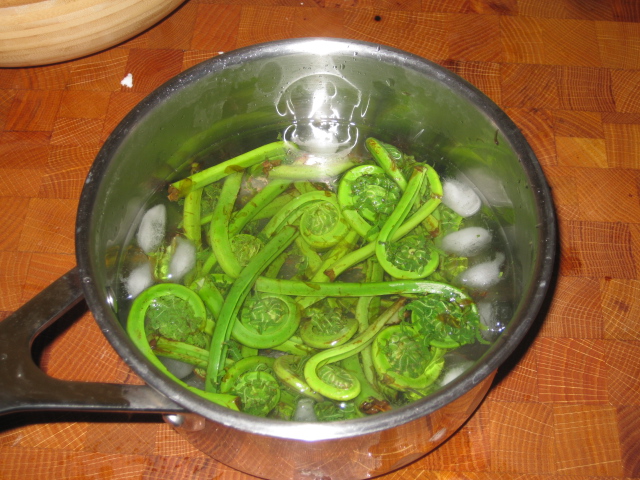
Bring a pot of salted water to a boil over high heat. Add the fiddleheads, cook for about 3 minutes or until tender-crisp.


Remove fiddleheads from hot water and plunge them into a bath of ice water (to stop them from cooking).


Return the water to a boil, add edamame and cook for 1 minute or until bright green, then drain and refresh in ice water. Place fiddleheads and edamame in a strainer and drain well.

Combine lemon juice, olive oil, pepper and sugar in a small Mason jar close the lid and shake well. Reserve

Toss fiddleheads, edamame and crumbled feta cheese with lemon juice dressing just before serving. Sprinkle with fleur de sel just before serving.

Serves 4-6


Sunday, May 29, 2011

Diner Party Part 1: Sausage and Cheese Empanadas

Although the weather did not really co-operate this weekend, I still had an awesome time. It all started with a trip to Vingo where we bottled our own wine (helped by 2 Alouettes Grey Cup champions!) and then a great dinner party with some of my favorite people (our first dinner party of the summer season).

As I mentioned before, I love to host dinner parties. Since the friends we were having over are pretty open-minded when it comes to food, I took this opportunity to try out some new foods (and also to prepare some old favorites). 

Here is the menu:

Appetizer: Sausage and cheese empanadas (this would be my husband's all time favorite)
Salad: Fiddlehead & edamame salad with feta
Entrée: Mango, pineapple and chicken kebabs
Cheese course: Warm brie in puff pastry with cranberry sauce
Dessert: Hazelnut pavlova tart with vanilla-scented strawberry and rhubarb

Dinner was a huge success. Lots of wine and liqueurs were drank (thank you Tony and Frank for the wine), there were very little food leftover at the end of the night and all our guests left with a smile on their face (sign of a huge success if you ask me!). 

This week I will be featuring all the recipes from the party, I hope you'll enjoy!

Sausage and Cheese Empanadas 
(inspired by a recipe from the Home Basic magazine which no longer exists)


4 uncooked spicy Italian sausages
¾ cup shredded cheddar cheese
¾ cup shredded Monterrey jack cheese
3 green onions, finely chopped
¼ cup chopped cilantro
1 package of puff pastry (397g), thawed
1 egg, beaten
Chili powder

Preheat the oven to 400° F. Remove the sausage meat from the casings and crumble into a medium skillet.


Cook over medium heat, stirring to break up clumps, until the meat is cooked. Drain off any fat and transfer sausage to a bowl. Let cool for a few minutes, then add the cheese, onion and cilantro. Mix well.


On a lightly floured surface, roll out half of the puff pastry to a 12-inch square.


Using the bottom of a dough press cut the pastry into circles (if you do not have a dough press, using a knife, cut the dough into 4 inch squares).


Place a circle into the dough press and then add 2 tablespoons of sausage mixture in the middle of each circle.


Brush the edges lightly with water and close the dough press (if you are not using a dough press, fold the pastry in half diagonally, pressing firmly to seal and form a triangle). Place the empanadas on a silpat on a cooking sheet. Repeat with remaining ingredients. Brush tops lightly with beaten egg and sprinkle with chili powder.


Bake 15 to 17 minutes or until puffed and golden brown.


This should give you about 18-20 empanadas (be warned, they will disappear quickly!)

Enjoy!


Friday, May 27, 2011

Mmmm Burgers!

So today was another rainy day… Actually this whole month has been so rainy that it feels like I’m living in Oregon again! So despite this bad weather, I’ve decided to post a summer inspire recipe. I guess I’m hoping that it will  inspire mother nature to give us some nice weather at last!

For me, summer is truly here when we can start barbecuing! This year my husband and I had to splurge and get a new barbecue since our old one literally started falling apart (I wish I was kidding). I must say that I was not really that sad to see the old one go… On top of having a giant hot spot (even if the BBQ was on low, we would have 6 inch flames…) it was way too small. A few years back I had bought this great veggie basket and when we got home I realized that we could not even cook 2 small steaks and veggies at the same time! What a disappointment!

Anyways, after some online and in-store shopping, we finally settled on a model that we hoped would let us enjoy many years of fine barbecuing (and that would let us use the veggie basket and grill some meat at the same time). Unfortunately, after my husband spent close to 1 hour putting it together, we realized that there was a dent on the cover and within one day of using it, it started rusting. On the bright side, our store was kind enough to let us exchange the cover only so that we would not have to take it apart and start all over again!


Since then, we have cooked many copious meals on our new barbecue and one of my favorite was these giant burgers that we made the first week we had it. They were both super moist and very flavorful. I hope you enjoy them too (actually, let’s hope that the weather gets better so that you can barbecue them!)!

Early summer BBQ burgers


1 egg
½ cup of bread crumbs (more if you are not using extra-lean ground beef)
1 tbsp Dijon mustard
1 tbsp Worcestershire sauce
½ tsp Tabasco
½ teaspoon chili powder
½ tsp each salt and ground black pepper
1 lb (500 g) extra-lean ground beef

Lightly oil grill and heat barbecue to medium. In a large bowl, whisk egg with Dijon, Worcestershire, Tabasco sauce, salt and pepper.


Using your hands, gently mix together the wet ingredients and the beef, then add the bread crumbs.


Shape into 4 burgers, each about ¾ in. (2 cm) thick.


Place burgers on grill. Barbecue, with lid closed, until burgers are cooked through, 6 to 8 min. per side.


Tuck into warm crusty buns. Serve with your favorite toppings.


Makes four large burgers 

Wednesday, May 25, 2011

Rhubarb season!


I love spring. For me, spring means the beginning of fresh locally grown fruits and vegetables, something that I look forward to all winter! One of the first things to be ready in my garden (actually to be more specific, in my mom's garden) is rhubarb. This year our rhubarb was superb! Very flavorful and juicy, perfect to make all my favorite recipes!


As a kid, I used to love dipping the rhubarb stalks in a bowl of sugar and just eating it like that. To me it was like eating candy. Of course, my mom would also make the traditional strawberry rhubarb pie, the strawberry rhubarb jam and the rhubarb crisp all of which would put a huge smile on my face. My mom would also freeze several bags of cut rhubarb so that we could enjoy delicious deserts all winter long. Although I would love to do the same, space is at a premium in my little freezer so that's not a possibility.  
So this year I decided to try something a little different. I am a big fan of apple sauce and with cookies as a last minute low-key dessert so I decided to try something similar but with rhubarb and I decided to can it to save space (let's face it, space is also at a premium in my fridge!).
With some help from my mom (over the phone) I tried to work on a recipe that would be quick and easy to make. If the whole canning things scares you, you can also just place it in mason jars and leave it in the fridge (it should last a couple of weeks).

So here it is, I hope you'll enjoy!

Rhubarb compote:

12 cups of rhubarb stalks finely chopped (1/2 inch)
1 cup of sugar (can be a little less or a little more depending on how sweet you like your rhubarb)
1/4 cup of water


In a large saucepan, place your finely chopped rhubarb (this time I used my food processor and it was great, it took less than 5 minutes to cut up all of it!), the sugar and the water. Bring to a boil and boil gently for 10 to 15 minutes or until the rhubarb is soft. Set aside.


In the meantime, prepare your canning pot. Place 7 clean 250 ml mason jars on a rack in a boiling water canner; cover jars with water and heat to a simmer (180°F). Set screw bands aside. Heat sealing discs in hot water, not boiling (180°F). Keep jars and sealing discs hot until ready to use.
Ladle hot compote into a hot jar to within 1 inch of top of jar (headspace). Wipe jar rim removing any food residue. Centre hot sealing disc on clean jar rim. Screw band down until resistance is met, then increase to fingertip tight. Return filled jar to rack in canner. Repeat for remaining pie filling.

When canner is filled, ensure that all jars are covered by at least one inch of water. Cover canner and bring water to full rolling boil before starting to count processing time. At altitudes up to 1000 ft (please check the Bernadin website for more information), process –boil filled jars – 15 minutes.

When processing time is complete, remove canner lid, wait 5 minutes, then remove jars without tilting and place them upright on a protected work surface. Cool upright, undisturbed 24 hours; DO NOT RETIGHTEN screw bands (this may damage the seal!).


After cooling check jar seals. Sealed discs curve downward and do not move when pressed. Remove screw bands; wipe and dry bands and jars. Store screw bands separately or replace loosely on jars, as desired. Label and store jars in a cool, dark place. For best quality, use home canned foods within one year.

Serve warm over ice cream or on its own with oatmeal cookies!


Monday, May 23, 2011

Food obsession

I have a confession to make: I love food.  While some people see food as a means to survive, food is my life. I am constantly thinking about the recipes I am going to make, buying ingredients, searching the web for new recipes, and watching cooking shows. I bake and cook when I’m happy as well as when I’m sad. Food is my escape when I need time to myself or when I want to forget about a not so great day at work. But food is also how I express myself and my way of making the people around me happy. I look forward to having friends over, trying to put together a menu that will not only please their taste buds but that also challenges my culinary skills.
Many moons ago, when my husband and I had been dating only a few months, I started hosting a yearly dinner for 6-10 of our friends for his birthday. I spent over a month looking at recipes and going over food combinations for this 8 course surprise dinner party (which just keeps getting bigger every year! 23 items on the menu last year!!). I had never prepared something quite so large for so many people, but I welcomed the challenge and looked forward to it (I still do every year). Seeing the smile on my friends’ face as they ate the food I had prepared was all the reward I needed, I was hooked.
But my love of food did not start over night. My parents were both great cooks. My mother mastered the art of traditional French Canadian cuisine, while my father was an amazing baker and the more adventurous cook of the family. I also grew up surrounded by my aunts and uncles’ cooking. There was my godmother who always served us a four course meal and my aunt and uncle, who would buy funky cheeses and other delicacies, and my uncle, the hunter who would give us deer or moose meat every year. But at the core of my family’s love and appreciation for food was my maternal grandmother. Growing up, I was lucky enough to live right next door to her. Every day the school bus would drop me off at her house and I would watch with amazement everything that she would make. Pies, Christmas logs, jellies, delicious soups, relish, breads, buns you named it, she made it. Everything she cooked was made with love and her biggest reward was to see the smiles on our faces when we got to eat whatever she had whipped up together that day.  In the 90’s she donated her favourite bread recipe book to my father (in order for her craft to be passed down to the next generation) who had spent many days with her studying her every move. When I got old enough he tought me everything he knew. I remember the joy on my grandma’s face when I showed her pictures of my first sticky buns and “monkey bread crown”, she almost cried she was so happy.
When I decided to start a food blog, I knew that my first recipe had to be just that. So, in honor of my grandma my first recipe is her sticky buns and monkey bread crown (known as Hungarian buns or Aranygaluska). I hope this recipe brings you as much joy and happiness as it has given me over the years! Bon appétit!


Basic sweet dough recipe 
(Originally from a Robin Hood book)


1 cup milk
½ cup sugar
2 teaspoons salt
¾ cup cold water
¼ cup butter (margarine would do in a pinch) at room temperature
½ cup lukewarm water
4 1/2 teaspoons dry active yeast (or two 8 gram packages)
2 teaspoons sugar
2 eggs (beaten)
7-7 ½ cup all-purpose flour

In a saucepan (or in a glass bowl in the microwave), bring the milk to a boil. Add ½ cup sugar, the salt, the butter and ¾ cup of cold water and mix well. Let the mixture cool for a few minutes (should be lukewarm before you add to the other ingredients otherwise it will kill the yeast).

In the meantime, take ½ cup of water (has to be at 100 degrees F, otherwise the yeast will not rise properly) and stir in 2 teaspoons of sugar. Add the yeast and let sit until the mixture has at least doubled (takes usually about 10 minutes).


Pour the yeast mixture in the bowl of your stand mixer and add the milk mixture (make sure it is lukewarm otherwise it might kill your yeast!). Add the eggs and mix well at the lowest speed with the flat beater.


Add 3 ½ cups of flour to the mixture and mix using the dough hook. Gradually add the rest of the flour and mix until the dough becomes uniform and fairly elastic (will take 7-10 minutes).


Cover the bowl with a lukewarm wet cloth and place in the oven with just the oven light on). Let it rise for 1 ½ hour or until the dough has doubled.


Once the dough is ready, take out of the oven, remove the cloth and punch the dough with your fist (this stops the dough from rising any further). 


Place the dough onto a lightly floured surface and cut it in half.


Hungarian buns (a.k.a. Monkey bread)

½ sweet dough recipe
2/3 cup melted butter
1 ½ cup brown sugar
4 teaspoons cinnamon
½ cup walnuts
½ cup raisin
½ cup Maraschino cherries (cut in half)


Grease an 8 – 9 inch metal bunt pan with butter. Set aside.
Mix the brown sugar and cinnamon in a small bowl.
In another small bowl melt the butter.
Separate the dough in 2 and form 2 cylinders.


Cut the cylinders into 1 inch pieces and roll pieces into balls.


Put a hand full of raisin, cherries, and nuts at the bottom of the buttered pan.


Put each dough ball into first the melted butter and then the sugar mixture.


Place the dough balls into the bunt pan and add cherries, raisins and walnuts between each layer of balls.


Once all the balls are in the pan, cover with a wet cloth (always lukewarm) and place in the oven (with only the light on) and let rise for 45 to 60 minutes or until the balls have close to doubled.


Pre-heat the oven at 375 degrees F and then cook for 35 to 40 minutes or until a toothpick comes out clean (it is always better to place a cookie sheet under the pan just in case the syrup spills over).


Wait 5 minutes and reverse the pan onto a plate. Serve warm with lots of butter.


Sticky buns

½ sweet dough recipe
½ cup melted butter
1 ½ cup brown sugar
1 -2 teaspoons cinnamon (depending on how much you like cinnamon)
¾ cup raisins

Grease an 8” by 11.5” by 2” pyrex pan with butter
Mix the brown sugar and the cinnamon. Set aside.
Roll out your dough into a large rectangle (dough should not be more than ½ inch thick). Add raisins on top and press them into the dough using a rolling pin.


Brush the surface with butter.
Lay the sugar mixture on top (distribute evenly on dough).


Roll the dough into a cylinder.


Cut the cylinder in half and then cut the each half into 8 pieces (about 2 inches each).


Place the pieces into the buttered dish, cover with a wet cloth and place in the oven with only the light on. Let rise for 1 hour or until the dough doubles.


Pre-heat the oven at 375 degrees F.
Bake for 30 to 35 minutes or until a toothpick comes out clean. 


Serve warm with lots of butter!


Both the sticky buns and the monkey bread keep for 2 days in a sealed container at room temperature. You can also freeze them for up to a month (but if you're anything like me, they won't last that long!)